A Few of My Favorite Things

Well, I think we’ve reached that point in our relationship.  You guys are SO supportive and I love you all SO much that I think the time has come.  We’re ready for the next step…

Hehe ok so I’m just being silly!  But seriously, I’m so grateful for all of the support I’ve gotten and I really want to share my favorite recipe EVER with you!  I’m ready to take that plunge! It’s call “Butternut Squash Enchilada Skillet” and, although I can’t claim the rights on inventing the concept, it’s my personal best recipe. This is the dish I make when I want to completely spoil myself.  And I mean that in both ways- treating myself to yummy food AND treating my body right!   You already know how I feel about Mexican cuisine and enchiladas.  Plus I top this off with avocado.. So there’s that. And it’s delicious and decadent and warm and spicy and cheesy and ohhh man.. I better stop.  How about we get down to what you really want to hear- how to make it!

This recipe contains butternut squash.  In case you weren’t aware, this is among some of the most delicious foods ever.  However, breaking down one of these bad boys takes a significant amount of elbow grease and for that reason, I’m going to give you a tutorial of how I slaughter, I mean chop, mine. If you’d rather not go through the effort- and it’s a lot, I always break a sweat- a lot of grocery stores sell it pre-cubed for your convenience.  Personally, I just do the hard work on a Sunday and have it ready to go for whatever night I want to cook it!  Ok, here it goes…

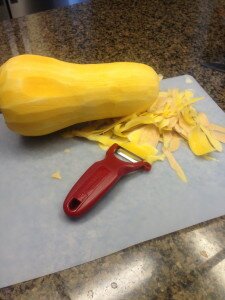
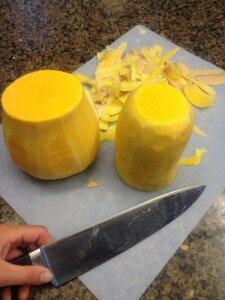
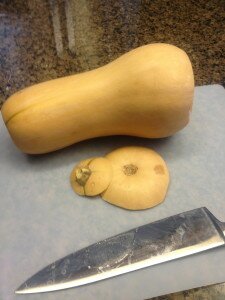
Start by cutting off the top and bottom of the squash.

Decapitated squash? Check.

Decapitated squash? Check.

Then peel all of the off skin using a peeler or sharp knife.

IMG_8001

Cut the squash in half, separating the base from the “neck”.

IMG_8002

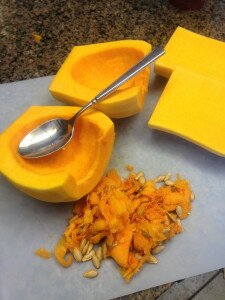
Both of these need cut in half now.  You’ll find that the base is full of seeds and stringy which are easy to scoop out.  The seeds are delicious roasted!  But that’s a recipe for another day…

IMG_8004

All cleaned out!

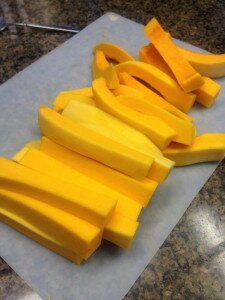
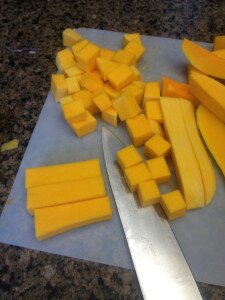
Once you have four big pieces, break those into stick-like shapes about an inch wide, preparing them for super easy chopping.

IMG_8006

Then just take a few at a time and cube them up! Your hand will be sore here.  Hang in there, the worst is over!

Looks like cheese hehehe

Looks like cheese hehehe

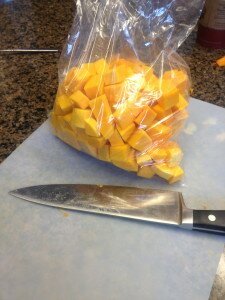
Voila!  Cubed squash!  That wasn’t too terrible right?! 😉 Throw it in an airtight bag in the fridge for later or get ready to use it in the following recipe!

IMG_8008

Alright.  So calling this “enchiladas” may seem confusing because there’s no filling, wrapping, rolling, stuffing, or any of that.  However, you’ve got all your basic enchilada components.  Black bean, squash, onion, and pepper “filling”.  Corn tortillas are sliced and mixed in rather than used as a wrap.  And of course sauce and cheese to top everything off!

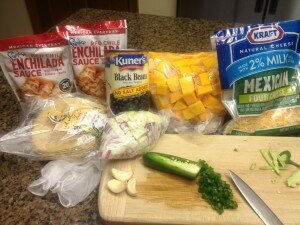
Everything you need!

Everything you need!

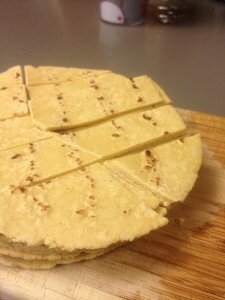
Once your ingredients are together, grab the largest sauté pan you have and turn on your oven’s broiler.  This is a BIG recipe so I like to use one with a lip around it to avoid spilling and mess- which usually happens regardless…  Get your olive oil heating in this pan over medium-high heat then add the onions and jalepeño and cook until they’re softened.  Then add the cubed squash and spices and sauté until tender.  Now, this is where the real flavor profile of this dish comes from.  I adore cumin in cooking and chili powder brings such a good heat.  Use more or less of that depending on your spice tastes.  Sautéing all these ingredients smells divine and I always find myself taking more than necessary samples to check for flavor and “doneness”.  Once the squash is fork-tender (but not completely falling apart), it’s time to add the beans, tortillas, and sauce.  Make sure your tortillas are cut into thick strips that can be easily mixed in.

I'm not sure why my cuts look so strange but you're just going for big strips/ pieces.

I’m not sure why my cuts look so strange but you’re just going for big strips/ pieces.

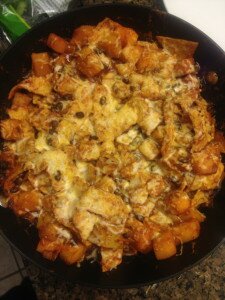
Once you’ve got those in there, mix in half of the cheese (1/2 cup) and reduce the heat to medium- low and simmer for a few minutes to get everything soaked in sauce and yummy gooey!  Now here’s the fun part, sprinkle on the remaining cheese and pop the whole pan under the broiler!  The cheese will bubble up and some of the tortillas get crispy in places and is literally SO GOOD.  This only takes a few minutes, which is lucky because I have a really really hard time waiting even a few minutes to eat this- the smells are unreal!

Look at that bubbly, cheesy top!

Look at that bubbly, cheesy top!

There ya have it!  My all time, absolute favorite recipe!  I promise this recipe is worth the work of butchering the giant butternut squash.  Or just cheat!  I won’t tell!  Either way, enjoy!

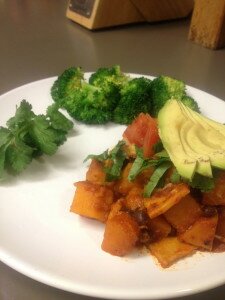
Finished product! Served up with avocado, cilantro, and steamed broccoli.

Finished product! Served up with avocado, cilantro, and steamed broccoli.

Butternut Squash Enchilada Skillet
Recipe type: Main
Cuisine: Mexican
Prep time: 
Cook time: 
Total time: 
Serves: 6
 
My favorite dish EVER! Top this off with some avocado and cilantro- more of my favorites. This recipe is healthy and delicious- an all around winner!
Ingredients
  • 1 Tbs olive oil
  • 1 large butternut squash, cubed (about 3-4 cups from a 2 lb squash)
  • 1 medium yellow onion, diced
  • 3 cloves of garlic, minced
  • ½ jalepeño, seeded and diced
  • 2 tsp cumin
  • 2 tsp chili powder (or 1 if you prefer less heat)
  • 1 15oz. can low sodium black beans, rinsed and drained
  • 8 small yellow corn tortillas, sliced into thick strips
  • 16oz. red enchilada sauce (two packs of Frontera is what I use)
  • 1 cup reduced fat Mexican shredded cheese
  • Cilantro, avocado, or 0% Greek yogurt for topping
Instructions
  1. Heat olive oil in large sauté pan over medium high heat.
  2. Add onions, garlic, and pepper and sauté until onions are translucent, 2-3 minutes.
  3. Add butternut squash, cumin, chili powder, and season with salt and pepper. Cook until squash is fork-tender, 8-12 minutes.
  4. Add sauce, beans, and tortilla strips and mix to coat everything in sauce.
  5. Reduce heat to medium-low and stir in half the cheese (1/2 cup), letting everything simmer for a few minutes.
  6. Turn on broiler and pop the whole pan in the oven for 2-4 minutes until the top is bubbly and starting to brown.
  7. Remove from heat and serve piping hot! Enjoy!
Nutrition Information
Serving size: ⅙ of recipe Calories: 333 Fat: 7g Saturated fat: 2.6g Carbohydrates: 50g Sugar: 6g Fiber: 9g Protein: 17.5g Cholesterol: 10mg


Chickpea Curry

Ohmygoodness! It’s been two weeks since I posted!  Please don’t hate me for not supplying a steady flow of recipes and filling you in on the RIVETING retails of my wildly exciting life.  Kidding, obviously.  I can’t say I have anything super interesting to report.  I did get a new car!  A really, really pretty new car from my parents that I was totally not expecting but my little old junker exhaled it’s final fumes and it was time for an upgrade.  Exciting right?! Well then today, 4 days later, I got rear-ended on the highway by some ass-hole (yeah, I said it) who decided to drive away.  Just drove away.  Life’s a roller coaster I guess!

So it’s  just been a bit of a normal grind..  5 exams last week also meant that my mom banned me from the kitchen.  Not because she doesn’t like my cooking… (Or at least I hope not)  but she wanted me to focus on school.  She knows I’m fully capable of “procrastibaking” and never getting any homework done.  Per usual, she’s right.  But.  Never fear.  I was able to sneak in a few delicious weeknight dinners this week that I will share this weekend!

The first yummy meal I’m going to share is sort of a best-of-both-worlds type deal.  It’s Indian-influenced so there’s that fun, exotic side to it…  But it’s so so so SO easy.  I’m talking 20 minutes tops easy.  I think we see an ethnic recipe and naturally think there’s some amount of skill involved because they’re unfamiliar.  But people are busy in every culture, and anything is easy with a little practice.  I do want to add, however, that I’m not guaranteeing any amount of authenticity to the “Indian-ness” of this recipe…  But it’s called Curry right?! 😉  Taste for yourself and decide.

I don’t have a ton of pictures- well, I barely have any at all- and this recipe is so easy so this will be a short post!  I’m sure you don’t mind me skipping all the yammering… So here we go!

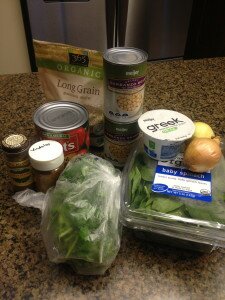
Such a terribly dark picture… But, this is literally all you need!

Such a terribly dark picture… But, this is literally all you need!

Gathering these ingredients is a snap.  A few pantry staples: crushed tomatoes, canned chick peas, onion, and brown rice (use boil-in-bag for an even quicker meal!)  Some grocery items: baby spinach, nonfat plain Greek yogurt, and fresh cilantro.  And spices: I used garam masala and vindaloo, both curry mixes, but either will do!

Cook your rice however you prefer, or according to package directions.  Or use leftovers!  Then the only real prep work was chopping he onions, for which I admittedly sometimes use that weird “Slap-Chop” thing that usually just collects dust in our kitchen…  So do what ya gotta do, but chop those bad boys up.  Throw them in a pan with a hefty spray of cooking spray and about a teaspoon of olive oil.  Cook those down over medium for about five minutes until they’re translucent and really starting to get a nice brown.  It’s totally ok if some get a little crispy- more flavor!  Then add your spices and stir for about 30 seconds, you’re really going to smell some wonderful things here.  This is a flavor base for the dish and personally, I think these smell divine.  Then just dump in your chick peas, crushed tomatoes, and spinach.   It’s going to look like a ton of spinach but it cooks down like crazy so don’t worry.

Side note on canned crushed tomatoes.  I can NEVER find them in a 15 oz can.  Ever. Anywhere.  It always comes in the most absurdly huge can.  If this same trouble befalls you, no worries- 15 oz is just shy of two cups.  So measure it out and turn the rest into marina sauce.  Yum!!  :)

Anyways… Once you’ve got the beans, tomatoes, and spinach in there you’re practically done!  Just let it simmer for about two minutes until that spinach has cooked down and is no longer taking over your pan.  Then pull it off the heat and mix in the greek yogurt and salt.  This is when you’ll really see it come together as the lovely, smooth, creamy dish that it is.  This is so great straight from the pan over rice and topped with fresh cilantro.  However, I’m possibly the world’s biggest leftover fan and this dish is divine the next day.  There’s something about letting the flavors and spices really come together that I think makes any dish better overnight, especially when you’re not relying on any crispy texture like with this dish.

So that’s it!  Super easy, so quick, and really really delicious!  Fresh cilantro brings a great brightness on top of this dish and I like to add a little (LITTLE) Sriracha for a kick of heat.  Give it a whirl!

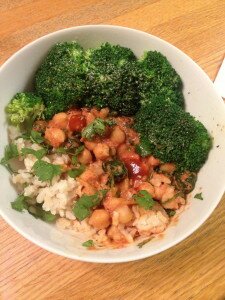
Served up here in a bowl over brown rice with some broccoli, sriracha, and cilantro!

Served up here in a bowl over brown rice with some broccoli, sriracha, and cilantro!

And the recipe!

Chickpea Curry
Recipe type: Main
Cuisine: Indian
Prep time: 
Cook time: 
Total time: 
Serves: 5
 
An easy, delicious, and healthy weeknight dinner! Try something different with some Indian spices! Serve over brown rice (not included in nutritional data).
Ingredients
  • 2 15oz. cans chick peas
  • 1 15oz. can crushed tomatoes (no salt added)
  • 1 medium onion, chopped
  • 1 6oz. package fresh spinach
  • ½ cup 0% fat plain Greek yogurt
  • 1 tsp Garam Masala
  • 1 tsp Vindaloo
  • ½ tsp salt
  • 1 tsp olive oil
  • Chopped fresh cilantro, optional (but recommended!)
  • Sriracha, optional
Instructions
  1. Spray a dutch oven or medium pot liberally with cooking spray, add olive oil, and heat over medium heat
  2. Add onions and cook approximately 5 minutes, until clear and browning
  3. Stir in spices for 30 seconds
  4. Add chickpeas, tomatoes, and spinach and cook for 2-3 minutes, until spinach is completely wilted
  5. Remove from heat and stir in Greek yogurt and salt
  6. Serve over rice with cilantro and hot sauce
Nutrition Information
Serving size: 1 cup Calories: 207 Fat: 3.3g Carbohydrates: 33g Sugar: 6.4g Sodium: 400mg Fiber: 9.7g Protein: 12.6g

Enjoy!

PS.  Happy late Valentines Day!  It sort of slipped my mind since John is out of town and we are celebrating next week…  Hope you all felt extra loved!!  :)

Easy Quinoa “Fried Rice”

Guys, it’s been a hell of a week.  With subzero temperatures, school work piling up, and the death of my ex-boyfriend and college friend, this week has taken its toll.  I won’t bring you down with a long sob story but losing John (Also my current boyfriend’s name.  Don’t panic.  He’s safe and wonderful as always.) has been one of the hardest things I’ve ever gone through.  He was 23, a great guy, and taken entirely too early.  May he rest in peace.

With this cold weather and a sad soul, I’ve been into delicious food involving minimal effort.  But, you know me, I’m not willing to sacrifice healthiness for comfort. So the other day, when it was literally -30 something wind chills out, I whipped up this fried rice with just the ingredients I had in my fridge.  No way was I venturing out to the store in that!

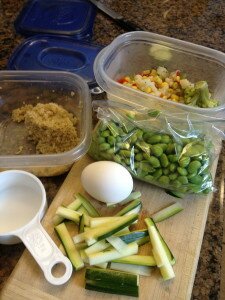
Lucky for me, my family could be the poster-child for leftovers.  Since we cook most of our meals instead of eating out, we tend to have extra bits and pieces laying around.  I noticed there was some quinoa, no-brainer.  We also had steamed some frozen “Mexican mixed vegetables” earlier in the week so those became my main veggies source.  A leftover nub of zucchini from omelets and my ever-present edamame also made the cut.  Side note: If you are a vegetarian you HAVE to keep edamame in your fridge.  No really, it’s a requirement.  The beans are a delicious snack, salad topper, taco filling, you name it!  Just buy the frozen stuff (like Trader Joe’s- my fav!), boil it on Sunday, and munch all week.  Anyways, with those simple ingredients and an egg for scrambling, I was all set.

Some fresh, some leftover, all delicious.

Some fresh, some leftover, all delicious.

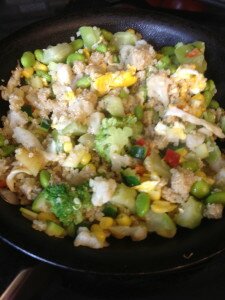
I started by scrambling the egg in a hot pan with some non-stick spray and chopped garlic & ginger.  No need for all the oil and grease you get in carry out.  Next I dumped in the raw zucchini first to get those cooked and added the pre-cooked mixed vegetables once that was softened.  Here’s the cool thing about this step.  You can add any variety of veggies here; frozen, raw, pre-cooked.  Just start with the ones that need the most time (frozen), and if you’re using some that need less time (raw, pre-cooked) add those after a few minutes. I added my edamame last as they can get mushy if they’re overcooked and I like them to have some snap. Then dump in your cooked quinoa- or rice, or couscous, or whatever grain you’ve got sitting in that fridge- and give it a mix!  Ta-da!

Look at that hot, steamy pan of…. Leftovers. Said no one ever. UNTIL NOW!

Look at that hot, steamy pan of…. Leftovers. Said no one ever. UNTIL NOW!

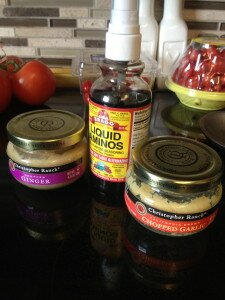
“Alright so I’ve got the veggies and the egg and the ‘rice’ but this doesn’t quite taste like real fried rice…”  Right you are.  You need some soy sauce, right?  Sorry, wrong this time!  Liquid aminos are where. it. is at.  This is a product made by Bragg (a super cool health-nut company) that is designed to taste like soy sauce with NO added salt and zero calories.  Best part is, because it’s a soy-based product, it contains 16 out of the 20 essential and non-essential amino acids your body needs to build muscle!  Helllll yeah.  My kind of soy sauce.  Check it out.

Yes. That's jarred garlic and ginger. Told you I was feeling lazy.

Yes. That’s jarred garlic and ginger. Told you I was feeling lazy.

Oh, and I bought it in this nifty spray bottle so I just gave my pan a healthy number of spritzes until I was happy with the flavor.  You can buy this stuff by the gallon though too… Go crazy.

Easy Quinoa "Fried Rice"
Recipe type: Main Dish
Cuisine: Asian
Prep time: 
Cook time: 
Total time: 
Serves: 1
 
An easy way to turn random leftovers into delicious, healthy fried rice! Don't have leftovers? Just boil some rice and chop some fresh veggies and you're set!
Ingredients
  • ½ cup cooked quinoa or rice
  • 1 cup mixed vegetables (raw, frozen, or cooked)
  • ½ cup cooked edamame beans
  • 1 egg
  • 1 tsp chopped garlic
  • 1 tsp chopped ginger
  • 1 Tbsp liquide aminos (adjust to taste)
  • Salt and pepper
Instructions
  1. Heat a medium frying pan over medium-high heat and coat with cooking spray
  2. Drop egg into pan and scramble just a minute or so- it should be undercooked since it will be in the pan longest
  3. Add garlic and ginger and stir for 30-60 seconds
  4. Add vegetables based on cook time (frozen first, then fresh, then pre-cooked)
  5. Once vegetable are cooked, add quinoa then edamame and stir until heated through
  6. Spray entire pan with liquid aminos, tasting for desired flavor
  7. Season with salt and pepper to taste and enjoy!
Nutrition Information
Serving size: 1 Serving Calories: 345 Fat: 12g Saturated fat: 3g Carbohydrates: 37g Sugar: 3g Sodium: 540mg Fiber: 10g Protein: 21g Cholesterol: 185mg


There ya have it!  Easy, quick, and delicious homemade fried rice!  This stuff won’t cure all your pains but I can tell you it helped me feel better and quit the pathetic sniffling for a while.

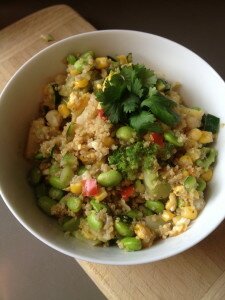
Vegetable Quinoa "Fried Rice"

Vegetable Quinoa “Fried Rice”

Much Love! Natalie


P.S.  I would like to give a HUGE shout-out to Renee, my wonderful boyfriend’s coworker, for not only subscribing to my blog and being the first to comment but for sharing my page on her Facebook.  WOW.  Thank you!  Be expecting some yummy treats in the AP department soon! 😉