That’s a Lotta Ricotta!

Surprise!  Two recipes in one post!  Mostly because school is slowly creeping it’s hands around my neck and I’ve barely had time to get my blog on.  Sorry.  Here’s two fun and yummy ricotta recipes to make up for it!

My mother and I tend to overestimate.  When it comes to packing for a trip, stressing about things we have to do, hosting a party, or stocking the house with food, we tend to go overboard.  Like, really overboard.  I don’t know how we always end up with 6 cans of black beans or 5 boxes of pasta, but we always end up with an “oopsies..” when we get back from the grocery.  Most of the time, it annoys me because I hate clutter.  But, it also means she puts a cute little note on the fridge saying what’s on “special” for the week. :)  It’s adorable…Anyways, after the boyfriend and I made a splendid meal for New Years, in which I intended to use ricotta but didn’t, there was a lot of this sweet, soft cheese laying around.  And to make things worse, my mom somehow had ricotta on the brain and ended up buying MORE at the grocery! Phew!  SO… I got majorly creative.  First, ricotta fritters.

Naturally, when I have a lot of one ingredient and not a lot of ideas, I turn to Pinterest for inspiration.  Can we just talk for a second about how awesome Pinterest is??  I don’t have as much free time as I used to so I don’t get to casually peruse page after page of beautiful people, places, food, and clothes I could never afford… But I do love using it as a place to look for inspiration.  All I had to do was type in “Ricotta” and a million recipes came up!  I saw a few recipes touting “healthy” patties but were loaded with full-fat cheese and deep fried in oil.  Ummm.. No thanks.  I gathered some inspiration, put my big girl pants, on and started playing around!  (Sad news- I was in full on experimentation mode and didn’t take ANY good pictures…. Sorry :/ )
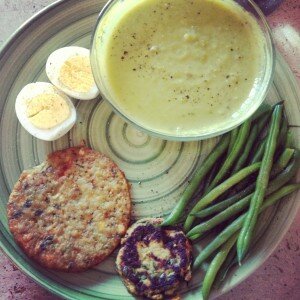
 

The ricotta fritter is the little guy at the bottom! Ignore the rest of my yummy leftover lunch...

The ricotta fritter is the little guy at the bottom! Ignore the rest of my yummy leftover lunch from the next day…

So for the fritters I just started throwing some ingredients in a bowl and let it “talk” to me.  I was going for texture here really.  When making something like this you want the cakes to be moist and not dry but they have to be able to hold together with some regularity.  That’s where the egg and breadcrumbs come in.  Be careful, though!  Whole grain bread crumbs are hard to find but I do strongly recommend them over their over-procesed, mostly-sugar sisters.  Also, to save on a some calories and fat I started with just one whole, beaten egg and used Egg Beaters egg whites until I had the right consistency.  If you’re going to go full-fat on any part of this though, just use real eggs.  It’s cool.  To fry these up I used a splash of olive oil and a healthy amount of olive oil Pam spray before I dropped the pre-shaped and chilled patties on the hot surface.  The first few were a mess but once I got the timing down and learned to only flip them once, they came out crispy and delicious!  Also, I made these very small because I wanted to be able to eat 4-5 as the protein part of a dinner or a 1-2 as a snack!   Try them for yourself!

Ricotta Fritters
Prep time: 
Cook time: 
Total time: 
Serves: 24
 
These little cakes come together quickly and last in the fridge as a hot or cold snack for up to a week!
Ingredients
  • 2 cups low-fat or part-skim ricotta cheese
  • ½ to 1 cup whole grain bread crumbs
  • 9 Tbs egg beaters (or 3 whole eggs)
  • 2 cups fresh (or frozen) spinach, finely chopped
  • 1 Tbs italian seasoning
  • Salt and Pepper to taste
Instructions
  1. Chop spinach into very small pieces
  2. Mix all ingredients except for spinach in a large bowl- I used my hands for this, to really make sure it was fully mixed
  3. Fold in spinach and chill in refrigerator for 20-30 minutes
  4. Divide the mixture into 4 parts and then divide each part into 5 or 6 balls
  5. Heat a small amount of oil or non-stick cooking spray in a pan over medium heat
  6. Shape the individual balls into a patty form and cook in pan a few minutes each side (they should get nice and brown- try to only flip them once!)
  7. Set on a plate to cool as you cook the rest of the batch, or store the chilled mixture in an airtight container in the fridge for up to one day
Nutrition Information
Serving size: 1 patty Calories: 40 Fat: 1.3g Saturated fat: 0.7g Carbohydrates: 4g Sugar: 1g Sodium: 90mg Fiber: 0.4g Protein: 3.4g Cholesterol: 14mg


If you’re feeling ricotta-crazy and really want to see what this yummy stuff can do, try this amaazzzing creamy pasta sauce!  I tossed mine with spiralized zucchini but I’m sure it would be fantastic on regular whole grain pasta as well.  With my new found love (and surplus) of ricotta, and my favorite food in the whole world in the fridge, I thought what better than AVOCADO ricotta “pesto” sauce.  Woah.  That’s a lot going on.  But it’s easy-peazy, promise.

On first attempt, I just had some avocado, tons of basil, and a little spinach and arugula wizzed up in the food processor and could not figure out all I was tasting was guacamole.  DUH.  No pesto ingredients… I threw in some lemon juice, olive oil, pine nuts, and parmesan and magic happened.  No seriously, 20 seconds turned this into a completely different cuisine.  I’ll be applying to Hogwarts next fall.  Soo with a little tinkering and some note-jotting, here is the “recipe” (in quotes because it’s too easy to be a real recipe!)

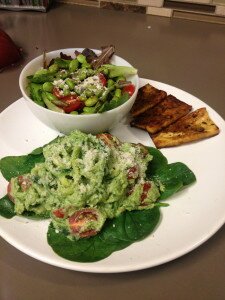
Served up with some baked tofu and a simple salad!

Served up with some baked tofu and a simple salad!

 Ricotta and Avocado Pesto “Cream” Sauce

Simply wiz together…

  • 1/2 an avocado
  • 1/2 cup low-fat ricotta cheese
  • 2 tsp grated Parmesan cheese
  • Small handful of pine nuts or walnuts
  • Fresh basil, spinach, arugula, or your other favorite leafy greens!
  • Olive oil until desired consistency
  • Squeeze of fresh lemon juice
  • Salt and pepper to taste

VOILA!  That’s it!


Haven’t had enough ricotta?  Yeah, me either.  Get ready for some ricotta recipes for the best meal of the day… DESSERT!  Coming soon! 😉
(Slightly Less) Homemade Enchiladas

Preface: I hope my last post didn’t freak you out and lead you to believe that I am some wack-o, hippie, earth-child who makes her own deodorant and doesn’t shave.  Not that’s there’s anything wrong with those people!  I wish I could be more like them in some (SOME.) aspects but I’m really just an average 20-something female.  As much as I wish I could make everything from scratch and buy only local, organic produce to handcraft every meal, I am also realistic.  With work, school, working out, and social life, I have made other priorities.  To contrast my last post, I’m posting the meal and recipe that I made later this week.  It is still healthy and light but with some pre-made, canned items.  This is for those of you who “can’t” cook or “don’t have time” to make “fancy” meals.

So with the Polar Vortex officially moved out and a nearly 50-degree temperature swing, school is back in full effect.  This also means that the bookstore I work at on campus has been slammed.  Lines out the door, running out of books slammed.  I’m exhausted.  So after classes and work and of course my 6:30am gym routine Thursday, I was hungry and lazy.  I needed some serious comfort food to keep me going.  Mexican.  When I think warm, comforting, hearty, and delicious I almost always think Mexican.  Something about cumin and spicy chili powder makes my soul smile.  Also, Mexican means avocados, my most favorite food on this entire planet.  Be prepared for a rant about that at some point.  Anyways, I decided on enchiladas because they’re easy and we had all of the ingredients.  Now about those ingredients…

I do use canned beans and pre-made enchilada sauce for this recipe.  Soaking beans was not going to be quick and canned beans could do worse in terms of ingredients.  Just be sure to rinse them extremely well as the liquid they are canned in is what contains the majority of the gas-causing chemicals (aka less farts! hehe).  When I make enchilada’s, I sometimes use a canned red sauce from a brand like Preferida or Old El Paso.  However, I have not been satisfied with them as they are LOADED with calories and sodium.  Why should my tomato sauce have as many calories as the enchiladas themselves??  Not fair.  So while at Meijer this weekend, I picked up two bags of Frontera’s* sauce packets.  They contain over a third less calories and had about ten ingredients, all of which I was familiar with.  No crazy-sounding preservatives or laundry list of chemicals. Score!!  It was time to see if their flavor lived up to the nutrition label.  The final pre-made ingredient I used is low-carb “tortilla” wraps.  Tumaro’s* brand is by far the best in this category and tastes just like a regular flour tortilla!  They are 60 calories, thinner and slightly smaller, and the multigrain ones contain a reasonable amount of fiber to keep you full.  I’m a fan.  We literally haven’t had regular tortillas in our house since we discovered these.  While I know I talked about not using “Diet” or specialized products, these are still very whole and not over-processed.  A great substitute for the full-calorie, real-deal thing.
A glance at a few of my "pre-made" ingredients!

A glance at a few of my “pre-made” ingredients!

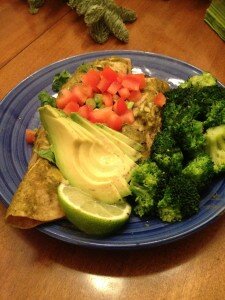
The process for making enchiladas is simple.  Fill, roll, smother with sauce, and bake!  I’m going out on a limb by even calling this a recipe because it doesn’t feel like cooking!  I topped mine with some green onions, cilantro, tomato, avocado, and a lime wedge but you could also use sour cream, 0% plain greek yogurt, fresh jalepeños, or whatever you like!

*Note: I am not endorsed or sponsored by these products or companies.  I just like them! :)
Look at all that green goodness!

Look at all that green goodness!

(Almost) Homemade Enchiladas
Recipe type: Main Dish
Cuisine: Mexican
Prep time: 
Cook time: 
Total time: 
Serves: 8
 
Easy, quick and (almost) homemade enchiladas!
Ingredients
  • 1 15oz. can refried beans (or homemade)
  • 1 15oz can reduced sodium black beans (or dry soaked)
  • 1 cup 2% shredded Mexican cheese
  • 2 packages ready-made enchilada sauce
  • 8 low-carb multigrain wraps
  • Any toppings you desire!
Instructions
  1. Preheat oven to 350.
  2. Lay all 8 wraps out flat and evenly divide the beans and half the cheese amongst them.
  3. Pour one packet of sauce into a casserole dish (9x9 worked for me) and shake around to cover the entire surface.
  4. Roll up one enchilada, roll it in the sauce, and repeat until they are all lined up in the pan.
  5. Pour the second packet of sauce over the top and sprinkle the remaining cheese over the whole dish.
  6. Cover with foil and bake for 30 minutes, pulling the foil off near the end to make sure the cheese melts.
  7. Top with avocado, green onions, cilantro, Greek yogurt, tomatoes, salsa, or whatever you desire! Enjoy!
Nutrition Information
Serving size: 1 enchilada Calories: 213 Fat: 5g Saturated fat: 1.8g Trans fat: 0 Carbohydrates: 32.8g Sugar: 3g Fiber: 12.6g Protein: 15g Cholesterol: 10mg

Homemade Veggie Stock

*This post was originally posted 1-10-14 and has been transferred from my old blog to this new one!*

This has been a weird week.  I was all freaked out for the start of the semester on Sunday and did a serious amount of anxious problem-avoiding.  AKA I chopped veggies, washed grapes, measured, bagged, cleaned, messed, cleaned, messed, cleaned…  Instead of organizing my things for the semester.  Lucky for me, classes were cancelled Monday AND Tuesday.  Literally, this never happens at Ohio State.  Thank youuuu Polar Vortex.  So, needless to say, this busybody had a lot of time on her hands.  Of course I decided to cook.  Nothing makes me more relaxed and happy than cooking.  Except the eating that follows the cooking.  So I ventured out and did a little homemade experimenting…

I have been collecting all of my vegetable scraps from my daily chopping, peeling, and cleaning and tossing them into a huge freezer bag for a few weeks.  It is seriously just as easy as throwing them away but way less wasteful!  Well, after my panic-induced frenzy on Sunday, it was bursting at the seams and begging to be used up.  So I dumped all the potato skins, carrot peels, celery leaves, spinach stems, wilted herbs, onion skins, garlic bits, asparagus stalks, and eggplant scraps into a pot and started making some homemade vegetable stock!  I had about 10 cups of scraps total (That’s a lot.  You can do this with significantly less.) so I used our mega-sized (12-quarts? I’m not sure…) pot and got it heated over medium.  While I was tempted to just dump on the water, close the lid, and let the magic happen, I decided to “sweat” the veggies for a bit.  I sprinkled them with some sea salt and fresh pepper and just let them thaw and cook out a little. This released a lot of the flavors from them, especially the onions and celery.  Once I could really smell some of the veggies starting to release their flavors, I dumped in the water, a bay leaf and some whole peppercorns.  It took about 20 cups of water to cover all the veggies enough that I could stir them up a bit while they cooked.  It took a long time for this to come to even a small boil.  I stared at this big-ass pot for at least 20 minutes- probably why it didn’t want to boil!- before I started seeing consistent bubbles.  Once that happened I popped on the lid and let it simmer for the length of an episode of Law and Order, about an hour.  Then I used a slotted spoon to pull out the big pieces and put them in the blender (you’ll see why in a bit).  After that, I poured the liquid through a colander lined with cheesecloth into a bowl and TA-DA!  Rich, homemade, chemical-free vegetable broth!  To store it, I divided the liquid into 1-quart freezer bags and set them between cookie trays on the porch to freeze.  Mr. Polar Vortex froze them in no time and the cookie sheets gave them flat bottoms and tops so they stack easily in my freezer!
In case you were wondering what I did with the soggy veggies and the blender…. They got wizzed on high for a few minutes with a good bit more salt to make veggie stock concentrate “packets”.  Ever bought those “Knorr homestyle stock” cups that you drop in the water and voila, there’s stock?  Ever wondered what on earth it was?  Yeah, me too.  Well no more wondering over here, I have my own!  I froze them in a mini muffin tin lined with sheets of Press-n-Seal freezer paper and they’re individually sectioned off and ready to use!
WARNING: It looks like poop.  Like greenish nasty baby poop.  It tastes a lot better.

This is a tough recipe to write because I literally had just a mess of scraps from a huge variety of vegetables but this is what I would recommend as a guideline.  Play around with the spices as you desire and use as much or little salt as you want- the great part is that you get to control your own sodium levels!  And any vegetables will do!  You’ll get a different color and slightly different flavor every time but that’s the fun of experimenting!

Happy Homemade!

5.0 from 1 reviews
Homemade Veggie Stock
Recipe type: Soup
Prep time: 
Cook time: 
Total time: 
Serves: 10
 
An easy vegetable stock using just the scraps you'd throw away anyways!
Ingredients
  • 5 cups mixed chopped vegetables or scraps
  • 10 cups filtered water
  • 1 bay leaf
  • 1 Tbs whole peppercorns
  • 1-3 Tbs salt (Pink Himalayan was my choice)
  • 1-2 tsp other seasonings of choice
Instructions
  1. Add all the veggies to a large stock pot over medium and allow to "sweat" but not quite cook, for 5-10 minutes.
  2. Add all other ingredients and stir.
  3. Cover pot and simmer for about an hour, stirring occasionally and adding seasonings and salt to taste.
  4. Remove from heat and allow to cool. Drain liquid into a bowl through a colander lined with a cheesecloth or clean dish rag.
  5. Package broth in freezer bags, cans, or jars and store up to 3 months in the freezer, one week in the fridge.
Nutrition Information
Serving size: 1 cup


1 2